A Beginner's Guide to Portrait Sketching
So you want to draw portraits. Good news, it's not some secret magic. It's a skill you can learn, just like anything else. This guide will walk you through the basics, from the right gear to getting a likeness, without the confusing art-school talk.
Why Draw Faces?
Before cameras, a portrait was the only way to show someone's face. These weren't just simple pictures. They were packed with symbols about who the person was, making them little historical records.
Today, even with phone cameras everywhere, a sketched portrait does something different. The artist interprets the face, capturing a personality, not just a physical copy. That’s what makes it powerful.
You Can Do This (Really)
Facing a blank page is scary. A lot of beginners worry they don't have "talent." Let's get this out of the way, talent is overrated.
Drawing is a skill you build with practice, not a gift. Every expert was once a beginner who made a lot of "bad" drawings. Those drawings are just steps on the path.
As a beginner, your taste is usually better than your skill. You know what good art looks like, and you know your stuff isn't there yet. This gap is frustrating, but everyone goes through it. The only way to close it is to draw... a lot.
Your Basic Gear
You don't need a fancy art store's worth of supplies. Just a few good basics will do the trick. Quality over quantity, always.

Pencils: Your Main Tool
At the heart of it all is the graphite pencil. The "lead" is actually a mix of graphite and clay. The ratio of that mix gives you different pencil grades for different jobs.
- H Pencils (Hard): More clay, less graphite. They make light, fine lines perfect for your first rough sketches.
- B Pencils (Black/Soft): More graphite, less clay. They make dark, rich marks that are great for shading.
- HB and F Pencils (Medium): The middle ground. An HB is a good all-purpose pencil for general sketching.
A small set from 2H to 6B is all you really need to get started.
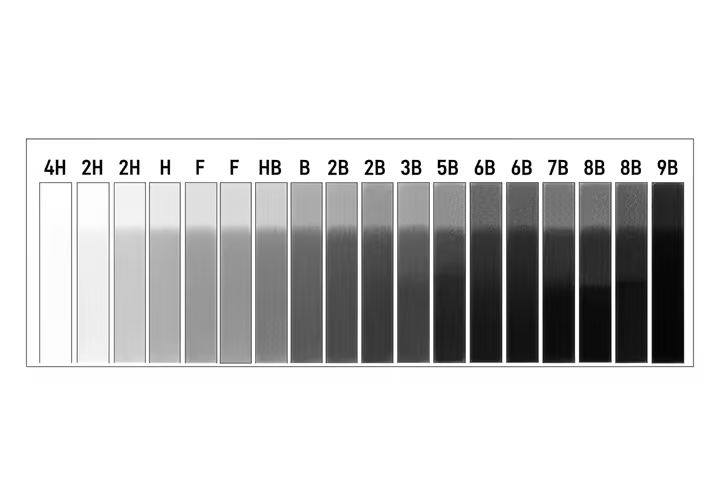
| Grade Range | Properties | Primary Use in Portrait Sketching |
|---|---|---|
| 4H–2H | Very Hard, Light Mark, Less Smudge | Initial construction lines, faint outlines for the head shape, and guidelines that can be easily erased. |
| HB, F, B | Medium Hard, Versatile | General sketching, defining the shapes of facial features, and light initial shading. The HB is an excellent all-purpose pencil. |
| 2B–4B | Soft, Dark Mark, Blends Easily | Building up mid-tones, shading larger areas to create form, and adding initial shadows. A 2B is a favorite among many artists for portraiture. |
| 6B–9B | Very Soft, Deepest Black, Smudges Easily | Creating the darkest values in your drawing, such as in the pupils, nostrils, deep shadows, and dark hair. Use these sparingly for maximum impact. |
Paper: What to Draw On
The paper you use matters. Two things to know are weight (thickness) and tooth (texture). More tooth grips the pencil graphite better.
A good plan is to use cheap paper for practice and save the nice stuff for finished work. Regular printer paper isn't great, it's too thin and smooth to hold graphite well.
| Paper Type | Typical Weight (GSM/lb) | Surface (Tooth) | Best For... | Beginner's Takeaway |
|---|---|---|---|---|
| Sketch/Cartridge Paper | 50–100 gsm / 20–50 lb | Medium Tooth | Quick practice, gesture drawings, and exploring ideas. | Excellent for affordable daily practice. Use this for your drills and warm-ups without fear of "wasting" it. |
| Drawing Paper | 100–200 gsm / 50–90 lb | Fine Tooth | Refined sketches, value studies, and developing finished pieces. | A great all-rounder for your main portrait work. It balances durability and cost effectively. |
| Bristol Board (Smooth) | 200+ gsm / 90+ lb | Very Smooth / No Tooth | Highly detailed work with mechanical pencils, creating clean, sharp lines and ultra-smooth blending. | Best for when you advance and want to focus on photorealistic detail. The smooth surface requires a more controlled shading technique. |
Erasers: More Than Mistake-Fixers
Think of erasers as drawing tools, not just for fixing mistakes. They create highlights and control your darks. You'll want two main types.
- The Kneaded Eraser (Putty Eraser): This soft, moldable eraser lifts graphite off the paper instead of rubbing it away. Use it to gently lighten shaded areas, create soft highlights in hair, or clean up smudges.
- The Vinyl/Plastic Eraser: This is a firmer eraser that removes graphite completely. It's great for erasing construction lines or creating sharp, crisp highlights, like the glint in an eye.
Blending Stumps: For Smooth Shading
To get smooth skin textures, you need a blending tool. A blending stump (or tortillon) is just a stick of tightly rolled paper used to smudge and soften your pencil marks. It pushes graphite into the paper's texture, creating a seamless look.
Other Useful Stuff
- Sharpener: A simple, good-quality metal sharpener is all you need. A sharp point is key for details.
- Charcoal (Optional): Charcoal can get much darker than graphite. It's great for adding punch to your drawings with deep, velvety blacks.
- Fixative (Optional): This is a spray that protects a finished drawing from smudging. In a pinch, a light coat of hairspray can also work.
The Big Secret: Draw What You Actually See
This is the most important rule in drawing. You have to draw what you see, not what you think you see. Your brain uses symbols to make sense of the world, like a simple almond shape for an "eye."
These symbols are useful in daily life but terrible for drawing. A beginner will try to draw their idea of a nose instead of looking at the actual nose in front of them. The trick is to turn off that symbol-making part of your brain and just see shapes, lines, and shadows.
How to Actually See
- Break It Down: Don't see an "eye." See a sphere with two curved lines over it. Don't see a "nose." See a wedge with a ball on the end.
- Squint: Squinting blurs out all the distracting little details like eyelashes and pores. It simplifies the face into big, easy-to-draw shapes of light and shadow.
- Use Your Pencil to Measure: Hold your pencil at arm's length to check angles and proportions. You can measure the width of an eye, then see how many "eye-widths" go between the eyes or across the nose. This beats guessing.
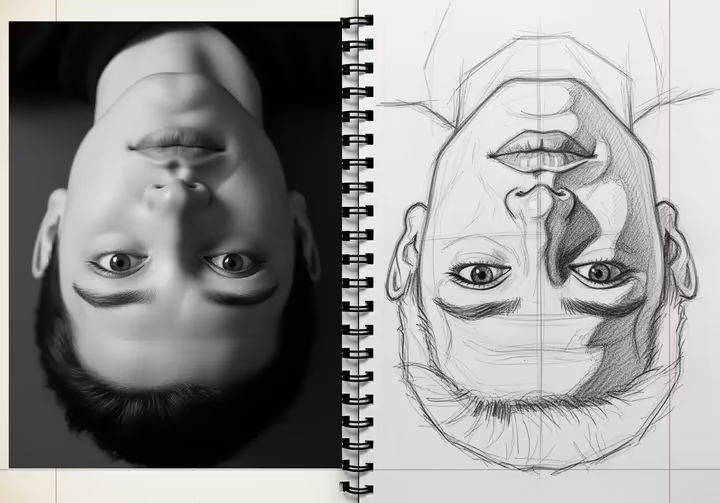
- Draw Upside Down: Turn your reference photo upside down and try to draw it. Your brain won't recognize the features, so it's forced to just copy the shapes and lines it sees. You might be surprised how accurate it turns out.
- Look at Negative Space: Instead of drawing the cheek, try drawing the shape of the background next to the cheek. Your brain doesn't have a symbol for that empty space, so it's often easier to draw it accurately.
Getting the Head Shape Right
Once you start seeing shapes, you need to know how to put them together. All faces are different, but they follow a basic set of proportions. Knowing these gives you a solid starting point.
Basic Proportions (The Cheat Sheet)
- The Eye Line: The eyes are about halfway down the head, from the top of the skull to the chin. Not higher up. This is the most common beginner mistake.
- The Rule of Thirds: The face can be split into three equal parts: hairline to brow, brow to bottom of the nose, and nose to chin.
- Eye Spacing: The space between the two eyes is usually the width of one eye.
- Nose and Mouth Placement: The edges of the nostrils often line up with the inner corners of the eyes. The corners of the mouth usually line up with the pupils.
- Ear Placement: The tops of the ears line up with the brow, and the bottoms line up with the base of the nose.

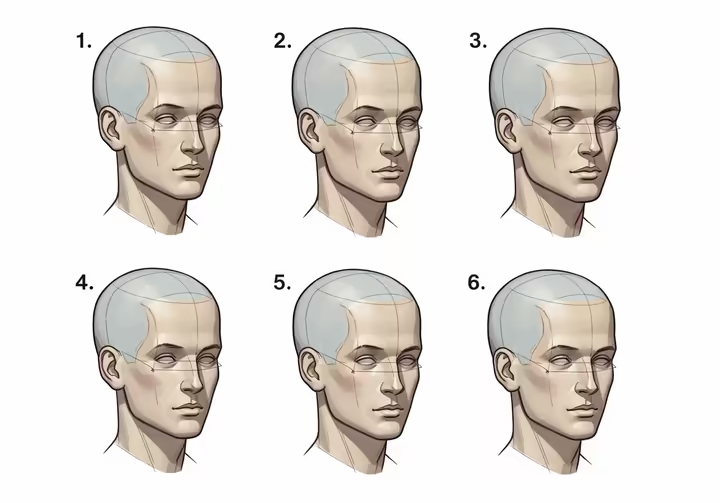
The Loomis Method (Your Secret Weapon)
The Loomis Method, from illustrator Andrew Loomis, is a great way to construct a 3D head. It makes you think about the head as a simple shape first, so you don't get lost in details too early.
- Step 1: Draw a ball. This is the cranium, the main part of the skull.
- Step 2: Add a cross. Draw a vertical line and a horizontal line that wrap around the ball. This shows which way the head is facing. The horizontal line is the brow line.
- Step 3: Slice the sides. The head isn't a perfect ball. Slice off the sides to create the flat temporal planes.
- Step 4: Map the face. Use the brow line to measure up to the hairline, then down to the nose line, and down again to the chin. You've just mapped out the three main sections.
- Step 5: Attach the jaw. Draw the jawline connecting from the side plane down to the chin you just marked.
- Step 6: Place the features. Now you have a solid structure. You can place the eyes, nose, mouth, and ears using your guidelines and the basic proportions.
Drawing the Features
With the head structure in place, it's time for the features. The key is to think of them as 3D forms, not flat symbols.
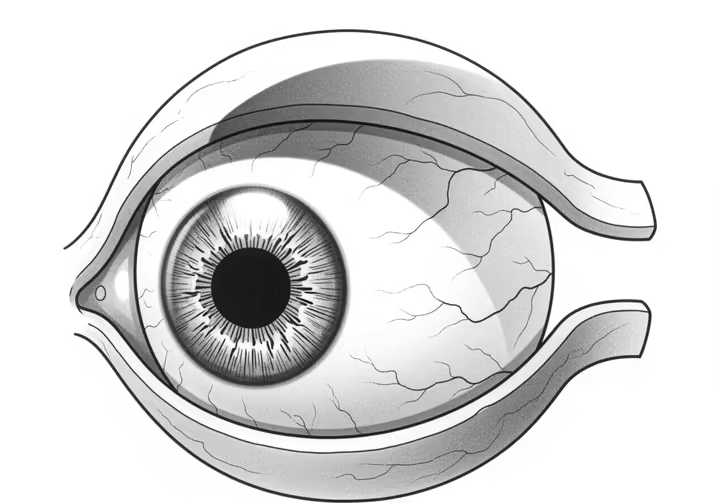
Eyes: Think Spheres
The eyeball is a sphere sitting in the eye socket. The eyelids are thick folds of skin that wrap around that sphere. Always show this curve, don't just draw flat almond shapes.
Also, the "whites" of the eyes are almost never pure white. They are spheres, so they have shadows, especially a soft one cast by the upper eyelid. Shading them makes them look round.
Nose: Think Planes
The nose is tricky because it doesn't have hard outlines. Simplify it into a wedge-like shape with a top plane (the bridge), two side planes, and a bottom plane for the nostrils. This helps you figure out where the shadows go.
Mouth: Think Cylinders
The lips aren't flat, they wrap around the curve of the teeth and jaw. Think of a can or cylinder under the lips. The line between the lips should follow this curve.
Hair: Think Big Shapes, Not Single Strands
Don't try to draw every single hair. It's a classic beginner trap that looks weird and flat. Instead, block in the entire hairstyle as one big shape.
Shade this large shape as if it were a solid object, with highlights and shadows. Then, break that mass into smaller chunks or "ribbons" of hair. Only at the very end do you add a few strokes to suggest the texture of individual strands.

Shading for 3D Fakes
Shading (or rendering) is what makes your drawing look 3D. It's not about randomly coloring things in, it's a logical process of adding value based on how light works.
Shading Basics
First, pick a single light source and stick with it. Is the light from above? The side? All your shadows must be consistent with that one source.
Value is just the lightness or darkness of a tone. Shading is using value to describe how a surface turns away from the light. This is how you create the illusion of form.
The Parts of a Shadow
- Highlight: The brightest spot, where light hits directly.
- Halftone: The area that's still lit but turning away from the light.
- Form Shadow: The part of the object facing away from the light. The darkest part of this is the core shadow.
- Cast Shadow: The shadow the object throws onto another surface (like the nose casting a shadow on the cheek). These are usually dark and have sharp edges.
- Reflected Light: Light that bounces off other surfaces and subtly illuminates the shadow side. This is why shadows aren't just flat black shapes.

Don't Be Afraid of the Dark
Many beginners are too timid with their shading, using only light and medium grays. This makes drawings look flat and washed out. To make a portrait pop, you need to use a full range of values.
This means having bright whites (just the paper), a variety of grays, and the richest blacks your softest pencil can make. A good trick is to find the darkest darks (like pupils or nostrils) and fill them in early. This gives you an anchor to judge all your other values against.
How to Practice (And Actually Get Better)
Theory is great, but improvement only comes from practice. A little bit every day is better than one long session once a month.
Daily Drills
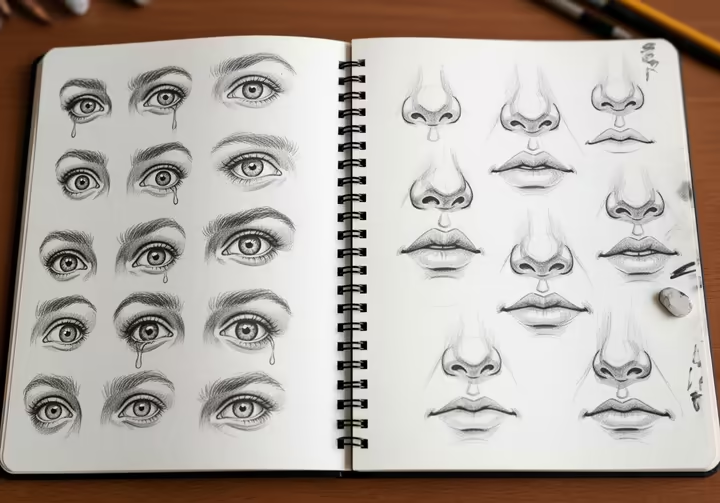
- Feature Studies: Fill a whole page with just eyes. The next day, do a page of noses. This builds muscle memory fast.
- Timed Sketches: Set a timer for 5 minutes and just try to capture the basic structure of a head. No details. This trains you to see the big shapes first.
- Master Studies: Copy portraits by artists you like. It's a classic learning tool, not cheating. You're figuring out how they solved problems.
- Emotional Portraits: Try to draw a face showing a specific emotion, like joy or anger. This is fun and teaches you about expression.
Drawing Yourself
The self-portrait is the ultimate practice tool. Your model is always available, works for free, and never complains. Sit in front of a mirror with a single light source (like a lamp) to create clear shadows.
Be an objective observer. Draw what you actually see, not what you wish you saw. This honest approach will make your drawings much stronger.
Life vs. Photos: Which is Better?
Both are useful. A balanced practice using both is the best way to learn.
- Drawing from Life: This is the gold standard for learning 3D form. You see how light really wraps around a head. The challenge is that your model might move and the light can change.
- Drawing from Photos: Photos are super convenient. The subject is perfectly still, so you have plenty of time for details and careful shading. The downside is that a photo is already a flat image, and cameras can distort proportions.
- The Best Strategy: Alternate between them. Draw from life (even your own reflection) to build your 3D understanding. Use high-quality photos to practice your shading and work on longer, detailed pieces.
Quick Dos and Don'ts
Here's a quick checklist of things to remember as you practice.
Common Mistakes to Avoid
- DON'T start with the details of an eye or nose. Build the whole head structure first.
- DON'T outline everything with a hard, dark line. It makes your drawing look like a cartoon.
- DON'T draw the generic symbol of a feature from memory. Look at your subject.
- DON'T smudge with your fingers. It's messy, you have no control, and the oils from your skin can ruin the paper.
- DON'T be afraid to use dark values. Contrast is what creates depth.
- DON'T leave the "whites" of the eyes as pure white paper. They need shading to look round.
Golden Rules for Success
- DO start with very light lines. They're easier to erase and adjust. Build up to your darks slowly.
- DO measure constantly with your pencil. Check angles and compare sizes.
- DO squint at your subject. A lot. It simplifies everything into big shapes of light and shadow.
- DO pick one light source and make sure all your shadows follow it.
- DO work from big shapes to small details. Head shape first, eyelashes last.
- DO practice regularly. Short, daily practice is much better than one long session once in a while.
- DO use a full range of values. Get your darks really dark and keep your highlights bright white.
- DO be patient with yourself. Learning to draw is a marathon, not a sprint. Every drawing is practice.
Works cited
- The timeless art of portraiture - Castle Fine Art, https://www.castlefineart.com/en-us/blogs/posts/the-timeless-art-of-portraiture
- Portraiture Evolution: A Journey from Classic to Modern - 1st Art Gallery, https://www.1st-art-gallery.com/article/portraiture-evolution-a-journey-from-classic-to-modern/
- Why Portrait Paintings Still Matter Today - Art Studio Life, https://artstudiolife.com/portrait-painting/
- Benefits of Portrait Art: Fostering Emotional Connection | iCanvas, https://www.icanvas.com/blog/benefits-of-portrait-art-fostering-emotional-connection/
- A History of Portraiture: The Timeless Appeal of Captured Faces - John Kafka Limited, https://johnkafkalimited.com/blogs/news/the-timeless-appeal-of-portrait-prints-exploring-the-allure-of-captured-faces
- The Aesthetics of Portrait Photography, https://aestheticsofphotography.com/the-aesthetics-of-portrait-photography/
- Conquer Your Fears: 4 Drawing Tips for Beginners Who Are Afraid to Start - ️the design sketchbook, https://www.thedesignsketchbook.com/is-it-difficult-to-learn-how-to-draw-4-mindset-tips/
- Overcoming Your Fear of Drawing People: A Beginner's Guide - Lemon8 App, https://www.lemon8-app.com/@antsonparade/7498117775471411758?region=us
- Overcoming Your Fear Of Drawing Once And For All! - Don Corgi, https://doncorgi.com/blog/overcome-the-fear-of-drawing/
- IWTL how to overcome the beginner's fear of drawing "badly". (I assume the same techniques can be applied to other situations.) : r/IWantToLearn - Reddit, https://www.reddit.com/r/IWantToLearn/comments/18dr33/iwtl_how_to_overcome_the_beginners_fear_of/
- I'm a beginner in drawing and want to learn to draw portraits. Where is the best place to start? - Quora, https://www.quora.com/Im-a-beginner-in-drawing-and-want-to-learn-to-draw-portraits-Where-is-the-best-place-to-start
- Drawing supplies for beginners | Caran d'Ache BE, https://www.carandache.com/be/en/drawing-supplies
- Understanding the degree of hardness of pencils - Eberhard Faber's, https://www.eberhardfaber.com/tutorials/Understanding-the-degree-of-hardness-of-pencils
- The Complete Guide to Graphite Pencil Lead Grade - Interwell Stationery, https://www.interwell.cn/the-complete-guide-to-graphite-pencil-lead-grade
- Pencil grades explained – Mont Marte Global, https://www.montmarte.com/blogs/tips-techniques/pencil-grades-explained
- Choosing and Using Sketching Pencils - My WordPress - Curtisward, https://curtisward.com/choosing-and-using-sketching-pencils/
- The #1 Drawing Mistake Made by Beginners Plus 7 More - The Virtual Instructor, https://thevirtualinstructor.com/blog/the-1-drawing-mistake-made-by-beginners-plus-7-more
- Best Drawing Papers for Pet Portraits in Pencil - Melanie & Nicholas, https://blog.pet-portraitartist.com/2025/01/best-drawing-papers-for-pet-portraits-in-pencil/
- the best paper to use when drawing pencil portraits - Personal Artworks UK, https://www.personalartworks.uk/best-paper-to-use-for-pencil-portraits/
- My search for the perfect drawing paper - Portrait artist Anna Bregman, https://www.annabregmanportraits.co.uk/project/best-drawing-paper-for-artists/
- Best Erasers for Drawing: The 9 Eraser Types for Artists | by Kevin ..., https://medium.com/@kjhayler/best-erasers-for-drawing-the-9-eraser-types-for-artists-a548183bb708
- Different Types of Erasers - The Virtual Instructor, https://thevirtualinstructor.com/blog/different-types-of-erasers
- Choosing The Right Erasers: A Beginner's Guide - Edmund Liang, https://edmundliang.com/2025/06/29/erasers/
- Tortillon - Wikipedia, https://en.wikipedia.org/wiki/Tortillon
- Detailed Guide: How to Use a Blending Stump | RapidFireArt, https://rapidfireart.com/2015/05/08/detailed-guide-how-to-use-a-blending-stump/
- How to Use Blending Stumps: Tips for Drawing and Shading - wikiHow, https://www.wikihow.com/Use-Blending-Stumps
- Big art dump because I really need some advice ! Where should I ..., https://www.reddit.com/r/learnart/comments/u1we0j/big_art_dump_because_i_really_need_some_advice/
- Draw What You See. Not What You Know | by Myra Naito | Medium, https://myranaito.medium.com/draw-what-you-see-2b0d580cd223
- Draw what you see, not what you think you see - Artbygordon, https://artbygordon.com/draw-what-you-see-not-what-you-think-you-see/
- what does everyone mean by draw what you see not what you think what you see? - Reddit, https://www.reddit.com/r/learntodraw/comments/1feocfl/what_does_everyone_mean_by_draw_what_you_see_not/
- How to create excellent observational drawings - 11 tips - Student Art Guide, https://www.studentartguide.com/articles/realistic-observational-drawings
- www.lemon8-app.com, https://www.lemon8-app.com/@antsonparade/7498117775471411758?region=us#:~:text=Start%20with%20basic%20shapes%20to,that%20set%20their%20work%20apart.
- Observational Drawing Techniques - MRS. BECK'S FINE ART CLASSES - Weebly, http://becktastic.weebly.com/observational-drawing-techniques.html
- tips for drawing portraits in pencil - Portrait artist Anna Bregman, https://www.annabregmanportraits.co.uk/project/tips-for-drawing-portraits/
- What are some portrait drawing tips for beginner artists? : r/ArtistLounge - Reddit, https://www.reddit.com/r/ArtistLounge/comments/o2inf7/what_are_some_portrait_drawing_tips_for_beginner/
- How to get better at drawing faces (8 Tips for Beginners), https://bingedrawing.com/portrait/get-better-at-drawing-faces/
- Trying to draw a portrait everyday until I'm good, very welcome to suggestions - Reddit, https://www.reddit.com/r/drawing/comments/zsgv1t/trying_to_draw_a_portrait_everyday_until_im_good/
- Get Creative with These Portrait Drawing Ideas: The Ultimate Beginner's Guide, https://fullbloomclub.net/portrait-drawing-ideas-the-ultimate-beginners-guide/
- How to Draw a Mouth step by step. A Tutorial for pen or graphic tablet, https://www.wacom.com/ja-jp/discover/draw/how-to-draw-a-mouth
- Loomis Method: 13 Steps for Drawing the Head – Binge Drawing, https://bingedrawing.com/portrait/loomis-method/
- Top 5 Portrait Drawing Mistakes - Art Prof, https://artprof.org/learn/tutorials-topic/portrait-drawing-mistakes/
- The Loomis Method of Drawing the Head, a Step-by-Step Guide - GVAAT'S WORKSHOP, https://gvaat.com/blog/how-to-draw-the-head-using-the-loomis-method-a-step-by-step-guide/
- How to Draw Heads with the Andrew Loomis Method | by Robert Marzullo - Medium, https://medium.com/@ramstudioscomics/how-to-draw-heads-with-the-andrew-loomis-method-78f9d04ab132
- 5 Tips on How to Draw Eyes Easily | Art Rocket - CLIP STUDIO PAINT, https://www.clipstudio.net/how-to-draw/archives/155631
- How do i get the eyes to feel more 3d? instead of just flat on the face? : r/learntodraw, https://www.reddit.com/r/learntodraw/comments/1hv7sos/how_do_i_get_the_eyes_to_feel_more_3d_instead_of/
- How to Draw a Nose – Anatomy and Structure – Stan Prokopenko, https://stanprokopenko.com/2012/09/video-draw-nose-anatomy-structure/
- How to Draw a Nose - The Virtual Instructor, https://thevirtualinstructor.com/graphitenose.html
- How to Draw a Nose - Anatomy and Structure - YouTube, https://www.youtube.com/watch?v=nWZZ3SFmDS8
- How to Draw Lips - Anatomy and Structure - YouTube, https://www.youtube.com/watch?v=Xq3aHSuKRyg
- How to draw a mouth and lips | Art Rocket - CLIP STUDIO PAINT, https://www.clipstudio.net/how-to-draw/archives/161618
- How to Draw Hair – Stan Prokopenko, https://stanprokopenko.com/2010/03/draw-hair/
- Basics of drawing hair by Tesscatt - Make better art | CLIP STUDIO TIPS, https://tips.clip-studio.com/en-us/articles/2280
- Drawing Hair with Form and Mass | Art Tips and Techniques - TikTok, https://www.tiktok.com/@prokotv/video/7177019055440809258
- 10 Essential Tips for Beginner Portrait Artists - Sktchy, https://shop.sktchy.com/blogs/blog/10-essential-tips-for-beginner-portrait-artists
- How To Get The Correct Values In Your Human Portraits ..., https://bonnysnowdonacademy.com/how-to-get-the-correct-values-in-your-human-portraits/
- Go From Flat to Realistic Shading! Here's How - YouTube, https://www.youtube.com/watch?v=MyrySvbuhsk
- Portrait Drawing Do's & Don'ts - Online Art Lessons, https://onlineartlessons.com/tutorial/portrait-drawing-dos-donts/
- DO'S & DON'TS OF DRAWING FACES!! - YouTube, https://www.youtube.com/watch?v=GywsqUaaSa4
- Sketching Five Portraits a Day - Life Drawing Academy, https://lifedrawing.academy/life-drawing-academy-news/sketching-five-portraits-a-day
- 5 simple Exercises to teach you how to Draw amazing Portraits - Crave Painting, https://cravepainting.com/blog/portrait-drawing-exercises
- Make all your portrait drawings better by practicing this step - Vincent Keeling, https://www.vincentkeeling.com/blogs/oil-painting-blog/make-all-your-portrait-drawings-better-by-practicing-this-step
- 8 Ways To Practice Drawing Faces, https://bingedrawing.com/portrait/practice-drawing-faces/
- How to Draw a Self-Portrait | Jerry's Artarama, https://www.jerrysartarama.com/blog/tips-for-drawing-self-portraits/
- Drawing A Self Portrait From Life - Simple Art Tips, http://www.simplearttips.com/tutorials-blog/draw-self-portrait
- A beginner's guide to painting a self-portrait - Artists & Illustrators, https://www.artistsandillustrators.co.uk/how-to/portraits-figurative/a-beginners-guide-to-painting-a-self-portrait/
- Life Drawing vs. Photo Reference: Pros, Cons, and Best Practices - Art of Stephanie Broder, https://www.stephaniebroder.com/blog/life-drawing-vs-photo-reference-pros-cons-and-best-practices
- Question: Is drawing from life necessary? - SVSLearn Forums, https://forum.svslearn.com/topic/7159/question-is-drawing-from-life-necessary
- Drawing from photos vs life - ArtGraphicA, http://www.artgraphica.net/learn-to-draw/drawing-from-photographs-or-from-life.html
- The Benefits Of Drawing From Life Rather Than Photos, https://drawingwithpri.art/blogs/blog/draw_from_life
- Are there any pros and cons when it comes to using photo or real references? - Reddit, https://www.reddit.com/r/ArtistLounge/comments/17dd32q/are_there_any_pros_and_cons_when_it_comes_to/
- Portrait drawing for beginners – Dos and Don'ts - RamyaSadasivams Art Gallery, https://ramyasadasivam.com/portrait-drawing-for-beginners/